To Find Documents and Add them to Globodox:
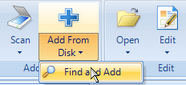
| 1. | In Globodox, click the Add from disk drop down and select the Find and Add option on the Ribbon bar. The Find and Add Files window will be launched.
 |
| 2. | Click this  button next to the Look in box of the Find and Add Files window, to select the folder in which you want to search the documents. This will bring up the Browse for folder window. You can also type in the location of the folder in the Look in box. button next to the Look in box of the Find and Add Files window, to select the folder in which you want to search the documents. This will bring up the Browse for folder window. You can also type in the location of the folder in the Look in box. |
| 3. | Select the folder and click OK. The folder's location will be displayed in the Look in box. |
A wildcard character is a keyboard character such as an asterisk (*) or a question mark (?) that you can use to represent one or more real characters when you are searching for files or folders. Wildcard characters are often used in place of one or more characters when you don't know what the real character is or you don't want to type the entire name.
Asterisk (*)
You can use the asterisk as a substitute for zero or more characters. If you're looking for a file that you know starts with gloss but you can't remember the rest of the file name, type the following:
gloss*
The Find and Add window will locate all files of any file type that begin with the word gloss including Glossary.txt, Glossary.doc, and Glossy.doc.
To narrow the search to a specific type of file, type:
gloss*.doc
In this case, the Find and Add window will find all files that begin with gloss but have the file extension .doc, such as Glossary.doc and Glossy.doc.
Question Mark (?)
You can use the question mark as a substitute for a single character in a name. For example, if you typed gloss?.doc, the Find and Add window would locate the file Glossy.doc or Gloss1.doc but not Glossary.doc.
|
| 5. | Check the Include Sub-Folders option to search for files within sub-folders (if any), of the selected folder. |
| 6. | Now, click the Search button. The files that match your search criteria will be listed in the List of files to be added pane. |
| 7. | Uncheck the Clear previous search results option if you want the list of files returned by the new search to be added to the list of the files returned by a previous search. |
| 8. | Click the Browse and Add button to select any additional files that were not found in the search (optional). The selected files will be listed in the List of files to be added pane. |
| 9. | In the List of files to be added pane, check the files that you want to add and uncheck those files that you do not want to add to Globodox. |
| a) | Click the Select All button to select all the files in the List of files to be added pane. |
| b) | Click the Select None option to uncheck all the files in the List of files to be added pane. |
| 10. | Check the Use exceptions option to use exceptions (optional).
You can use Exceptions to exclude or include a particular file or file types to Globodox.
Example:
The folder that you have selected contains pdf, doc, tiff and jpeg files. However, if you only want to add .doc files, then you can use an exception which will add the .doc files and exclude the remaining files.
 Click here to learn to use Exceptions Click here to learn to use Exceptions |
| a) | Click the Exceptions button to add exceptions. The Exceptions window will be launched. |
| b) | Select the Do not add these files tab to specify the file or file type you want to exclude and then click the Add button. E.g. if you do not want to add .pdf files to the List of files to be added pane, then type *.pdf in the text box and click the Add button to add it to the list. |
| c) | Select the Add only these files tab to specify the file or file type you want to include and then click the Add button. E.g. if you only want to add .doc files to the List of files to be added pane, then type *.doc in the text box and click the Add button to add it to the list. |
| d) | To remove an Exception from the list, select it and click the Remove button. |
| e) | Click the OK button to close the Exceptions window.
|
|
| i. | Select a folder from the list. You can use the Search box to search a folder. |
| ii. | Click the OK button to select the folder. The selected folder will now be displayed in the Choose a Folder box. |
|
| b) | You can add Tags (keywords) to the selected files in the Attach Tags option. You can type as many tags as you want by using a semi-colon to separate them. |
| c) | Set the Document Type of the document, from the Set a Document Type drop down. E.g. Set the Document Type to 'Invoice' if the selected files are invoices. |
| i. | Select the Stack Type from the Look for drop-down of the Stack that you want to relate with the selected files. |
| ii. | Now, type a word that describes the Stack in the Look for box. Click the Find button to find the Stack. The Stacks that contain the word that you have entered in the Look for box will be displayed in the Available Data list. |
| iii. | Select a Stack in the Available Data list, to relate it with the selected files. Use this  button to add the selected Stack to the Selected Data list and use this button to add the selected Stack to the Selected Data list and use this  button to remove the Stack from the Selected Data list and move it back to the Available Data list. button to remove the Stack from the Selected Data list and move it back to the Available Data list. |
| iv. | Click the OK button to select the Stack. The Stack will now be related with the selected files and will be displayed in the Attach to existing Stack box.
Also see, Relate a Document to a Stack |
|
|
| a) | Click this button next to the Link to existing documents box. The Look Up window will be launched. |
| b) | Select Documents option from the Look in box and type all or part of the file name in the Look for box. |
| c) | Now, click the Find button. The documents that contain the word that you have entered in the Look for box will be displayed in the Search Result list. |
| d) | Select the document that you want to link with the selected files and add it to the Selected Files list. |
| e) | Click the OK button to link these documents.
Note:
You can add more links by clicking this  button and you can break a link by clicking this button and you can break a link by clicking this  button. button.
Also see, Link one Document with another Document
|
|
Use the Link to existing Stack box to link the selected files to existing Stacks Item
| a) | Click this button next to the Link to existing Stack box. The Look Up window will be launched. |
| b) | Select the Stack from the Look for drop-down of the Stack, that you want to relate with the selected files. |
| c) | Now, type a word that describes the Stack in the Look for box. Click the Find button to find the Stack. The Stacks that contain the word that you have entered in the Look for box will be displayed in the Available Data list. |
| d) | Select the Stack in the Available Data list, to relate with the selected files. Use this button to add the selected Stack from the Available Data list to the Selected Data list and use this button to remove the Stack from the Selected Data list and move it back to the Available Data list. |
| e) | Click the OK button to select the Stack. The Stack will now be related with the selected files and will be displayed in the Attach to existing Stack box.
Note:
You can add more links by clicking this button and you can break a link by clicking this button.
Also see, Link Document with Stacks
|
|
| a) | Click this button next to the Share with box to select the users to share the selected files. The Share window will be launched. Select the users and click the OK button. The users will be displayed in the Share with box. |
| b) | Click this button next to the Restrict from box to select users from whom you want to restrict the selected files. The Restrict window will be launched. Select the users and click the OK button. The users will be displayed in the Restrict from box. |
| c) | Click this button next to the Assign to box to select the user to assign the selected files. The Assign window will be launched. Select the user and click the OK button. You can assign a document to only one user. The user will be displayed in the Assign to box. |
| d) | Select a Security Label from the Set a Security Label drop-down to set a Security Label for the scanned document.
|
|
| 14. | Now, click the Add button to add the selected documents to the Globodox DB.
Note:
Once the documents are added, you will get a confirmation message box asking you whether you want to delete the added files from the original location (on the disk). If you want to delete the added documents then click the Yes button; if not, then click No.
|
| 15. | Click the Close button to close the Find and Add window. |
|

