Globodox uses Destination Profile to simplify the process of adding documents.
Destination Profile is a collections of information about the document like its Document Type, its Stack and its folder which can be saved and reused from the above windows.Instead of specifying these settings every time you add a document, you can specify these settings once and save them as Destination Profiles.
For example:
Let's say on a daily basis you scan Invoices received from Acme Corp. You then set their Document Type to Invoice, and relate the documents to the Acme Corp. Stack. You make your work easy by creating one Destination profile for Acme Corp. Invoices.
You can create as many Destination Profiles as you want.
You can create Destination Profiles from...
Scan window
Find and Add window
Add Folders from disk window
To Create a Destination Profile using the Destination Profiles Manager
| 1. | In Globodox, select the Tools tab and click the Destination Profiles button. This will bring up the Destination Profiles Manager Window. |
| 2. | In the Destination tab, enter a name for the new profile in the Select a destination profile box. |
| 3. | Enter the required information in the Settings pane. |
| 4. | You can specify information to link the added documents with other documents by using the Links tab. |
| 5. | Use the Security tab to automatically assign the added documents to a specific user |
| 6. | Once you have specified this information then click the Save button besides the Select a Destination profile box to save these information as a Destination Profile. The Destination Profile will now be listed in the Select a Destination profile drop-down.
|
To Create Destination Profile from the Scan Window
| 1. | In Globodox, select the Home tab and click the Scan button. This will bring up the Scan Window. |
| 2. | In the Destination tab, enter a name for the new profile in the text Select a destination profile box. |
| 3. | Enter the required information in the Settings pane. |
| 4. | You can also specify information to link the scanned documents with other documents and Stacks by using the Links tab. |
| 5. | You can Share, Assign or Restrict the selected files with other users by using the Security tab. You can also apply a Security Label to the selected files by using this tab. |
| 6. | Once you have specified these information then click the Save button besides the Select a Destination profile box to save these information as a Destination Profile. The Destination Profile will now be listed in the Select a Destination profile drop-down. |
To Create Destination Profile from the Find and Add Window
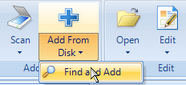
| 1. | In Globodox, click the Add from disk drop down and select the Find and Add option on the Ribbon bar. The Find and Add Files window will be launched.
 |
| 2. | In the Destination tab, enter a name for the new profile in the Select a destination profile box. |
| 3. | Enter the required information in the Settings pane. |
| 4. | You can also specify information to link the scanned documents with other documents and Stacks by using the Links tab. |
| 5. | You can Share, Assign or Restrict the selected files with other users by using the Security tab. You can also apply a Security Label to the selected files by using this tab. |
| 6. | Once you have specified these information then click the Save button  besides the Select a Destination profile box to save these information as a Destination Profile. The Destination Profile will now be listed in the Select a Destination profile drop-down. besides the Select a Destination profile box to save these information as a Destination Profile. The Destination Profile will now be listed in the Select a Destination profile drop-down. |
To Create Destination Profile from the Add Folders from Disk Window
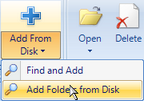
| 1. | In Globodox, click the Add from disk drop down and select the Add Folders from disk option on the Ribbon bar. The Add Folders from disk window will be launched.
|
| 2. | In the Destination tab, enter a name for the new profile in the Select a destination profile box. |
| 3. | Enter the required information in the Settings pane. |
| 4. | You can also specify information to link the scanned documents with other documents and Stacks by using the Links tab. |
| 5. | You can Share, Assign or Restrict the selected files with other users by using the Security tab. You can also apply a Security Label to the selected files by using this tab. |
| 6. | Once you have specified these information then click the Save button besides the Select a Destination profile box to save these information as a Destination Profile. The Destination Profile will now be listed in the Select a Destination profile drop-down. |
|
Notes:
| • | To delete a Destination Profile, click the Delete button besides the Select a destination profile box. |
Related Topics
Scan mutilpe single paged document
Find and Add a document
Add the existing folder structure along with files from disk
Page URL:
https://www.globodox.com/support/help/index.htm?create_destination_profiles.htm

